1099 Processing for First Year in SGA Accounting
Forms:
- If you plan to file paper forms with the IRS, you will need to purchase pre-printed (red copy) 1099-NEC and 1099-MISC (If used) forms.
- If you plan to file electronically with the IRS, you do not have to purchase pre-printed forms, as you can print the vendor/office 1099-NEC/MISC copies on plain paper. SGA Accounting prints two vendors per page for MISC and three vendors per page for NEC—the same look as a purchased pre-printed form. You can cut the sheets in half with a paper cutter. The forms will fit in the 2021 standard 1099-NEC window envelope for mailing if you like. Note: The form has changed for NEC from a 2 up to 3 up for the year 2021.
- In order to file electronically, you must have a TCC (Transmitter Control Code), which the IRS assigns. If you need to apply for such, file Form 4419 online with the IRS. irs.gov/firstcc. We highly recommend electronic filing! For more information and detailed instructions, please email us at support@sgasoftware.com
- Vendor amounts paid in SGA and your old system will be combined, and one 1099-MISC form per vendor.
Steps to process 1099’s: (after all payments have been processed through December 31)
- Coordinate with SGA Support that all 1099 setups are in place for you and ready for you to proceed with the following processes. SGA Support will be happy to guide you through the process.
- Menu option Month End > 1099 Process. At the top left of the screen, click Generate. This reads all of the vendor payments in SGA Accounting for the year and creates the 1099 figures. You will run this option only once. Running the generate option again will clear all existing totals—both auto-generated and those entered manually.
- On the 1099 Browse screen, there are various view selections and/or filters available. Select a view that displays columns Amount Paid (total amount paid in SGA), Amount Tagged (invoices tagged for 1099 reporting during invoice entry throughout the year), and Amount Not Tagged (invoices that have not been tagged throughout the year. These three columns are helpful in analyzing what was paid vs. what is tagged for 1099 reporting.
- The column Vendor Code displays those vendors who are designated as 1099 vendors (or not). You can filter the screen to display only Vendor Code M.
- To tag/untag vendor payments (paid in SGA), click to highlight the row and click Tag (top of the screen). Mark the Tagged Code column with the appropriate code. (Example M=Box 7; R=Box 1, etc.) Click Save when finished. Click Display to refresh your screen as needed.
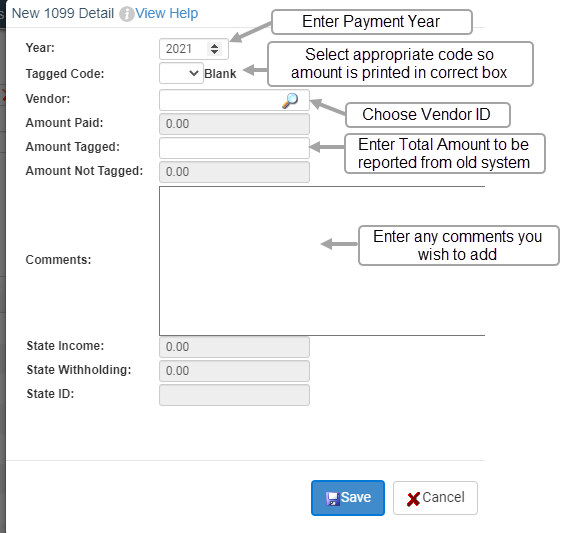
- If you have sent SGA your totals from the prior system, contact them at this point to add them in on the back end. If not, you can manually add the vendor payments from your prior system. At the top of the screen, click New. Add the total 1099-reportable amount paid from your prior system for each vendor.

- If you have too many payments to enter manually, contact SGA to see if amounts can be imported from a spreadsheet.
- Rows displayed on the 1099 browse screen will be a total of your old system reportable payments, along with the SGA vendor total. In many cases, there will be two rows for the vendor total that together make up the reportable amount. To combine the total amounts displayed on the screen, check Summary at the top of the screen.
- If you need to adjust amounts that were manually entered from your old system, double-click on the row and edit the Amount Tagged.
Important! Using the Tag menu option will delete any manual 1099 amounts for the vendor and will be replaced with the amount tagged. If you have manual 1099 amounts entered from your old system, you should Edit the amount instead of tagging; in this way, both amounts (old system and new system) will remain.
10. Forms will be printed for every amount that is tagged with any 1099 Form code. For a list of what will print, select the following filters. The Reports dropdown arrow allows you to print the list or send it to Excel.
ALL

PRINT 1099 MISC
PRINT 1099 NEC
11. To edit vendor name/address, click the Vendor button at the top of the screen. Click the Options button on the vendor screen to edit the vendor’s Federal ID# or name override.
12. Before printing the forms, double-check the following settings:
- Go to Settings > General Settings > Company Information. The company name, address, and Federal ID# will be printed on the forms.
13. See 1099 Electronic Filing for requirements to file electronically. Starting tax year 2023, if you have 10 or more information returns, you must file them electronically. Find details on the final e-file regulations.
14. When you are ready to create the transmittal file, go to the 1099 Browse screen and click Create File. You must create a separate file for each form type needed (MISC, NEC, INT, etc.). The files are each created separately due to different reporting deadlines.
- Transmit each file separately to the IRS within the platform your TCC Code is assigned (FIRE, IRIS).
